Alerts
This tab contains information about created alerts.

The alerts are intended for signaling about events in the market. Having created alerts, one may leave the monitor as the client terminal will automatically inform about the server event.
All alerts in this tab are represented as a table with the following fields:
- Symbol – security the data on which are used to check for the condition specified. If the "Time=" parameter (alert triggering at the pre-defined time) was selected as a condition, the symbol does not matter;
- Condition – condition under which the alert will trigger. The following can be used as such a condition:
- Bid> – the Bid price is higher than the specified value. If the current Bid price exceeds the given value, the alert will trigger;
- Bid< – the Bid price is lower than the specified value. If the current Bid price goes under the given value, the alert will trigger;
- Ask> – the Ask price is higher than the specified value. If the current Ask price exceeds the given value, the alert will trigger;
- Ask< – the Ask price is lower than the specified value. If the current Ask price goes under the given value, the alert will trigger;
- Time= – time is equal to the given value. As soon as this time comes, the alert will trigger.
- Counter – the amount of alert triggerings;
- Limit – maximum permissible amount of the alert triggerings. Having triggered this given amount of times, the alert will stop triggering;
- Timeout – the period of time between alert triggerings;
- Expiration – this field displays a lifetime of the alert. At the specified time the alert will be automatically deleted. The local computer time should be indicated here.
- Event – the action to be performed. This can be an audio signal, a file executable in operational environment, a message sent by email or a push notification sent to a mobile device.
Alerts Management
The following context menu commands are intended for managing alerts:
- Create – create a new alert. The same action can be performed by pressing of the Insert key;
- Modify – edit the alert. The same action can be performed by double-clicking on the alert name in the table or by pressing of the Enter key;
- Delete – delete the alert. This action can also be performed by pressing of the Delete key;
- Enable On/Off – enable/disable the alert. The alert will not be deleted when disabled, but it stops to trigger. It can be enabled later. The same action can be performed by pressing the Space key or enabling in the alert setup window (described below).
Attention: To manage alerts with the keyboard, one should activate this window first. To do so, it is necessary to click with the left mouse button in the window. |
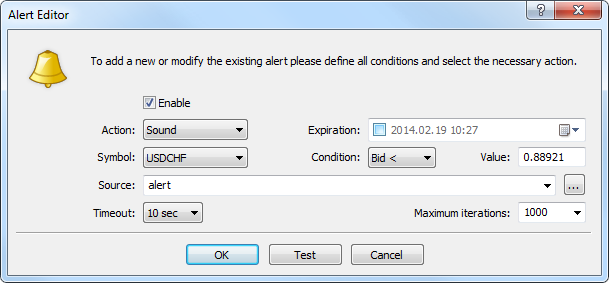
One can start modifying of the alert by double-clicking of the left mouse button in the alert information line. In this case, as well as at execution of the "Modify" and "Create" context menu commands, the alert editor window will appear:

- Enable – alert on/off. When the alert is off, it is not deleted, but it will stop functioning. This option is similar to the "Enable On/Off" context menu command and pressing of the Space key;
- Action – action performed when an event happens:
- Sound – play a sound file;
- File – run an executable file;
- Email – send message to the email specified in the terminal settings.
- Notification – send a push notification to a mobile device. Sending push notifications requires specification of the MetaQuotes ID in the terminal settings. MetaQuotes ID is a unique identifier, which is assigned to each mobile terminal during installation on a device. Push notifications are an effective means to notify of events, they are instantly delivered to the mobile device and are never lost. The message text is specified in the "Source" tab.
- Expiration – in this field, one can specify a lifetime for the alert. At the specified time the alert will be automatically deleted. The local computer time should be indicated here.
- Symbol – security the values of which will be used to check the condition;
- Condition – condition ("Time=", "Bid<", "Bid>", "Ask<", "Ask>") under which the alert will trigger;
- Value – check value of the condition. If the symbol price is equal to this value, the alert will trigger;
- Source – depending on the typy of action performed when an event occurs, one of the following is specified here:
- a sound file in *.wav, *.mp3 or *.wma.
- an executable file in the *.exe, *.vbs or *.bat format.
- an email template. If you select "Email", a click on this field will open a window for writing a template of an email to be sent to the address specified in the terminal settings. You can also just write an email text message in the format "email subject\n email text";
- a text of a push message. The maximum message length is 255 characters.
- Timeout – the time period between alert triggerings;
- Maximum iterations – maximum amount of times the alert repeats triggering.
The "Test" button allows to check the usability of the selected alert. For changes to come into effect, one must press the "OK" button.
Attention: To send messages about events happened, one has to set up mailbox parameters in the program settings. |
Creating Alerts on Chart
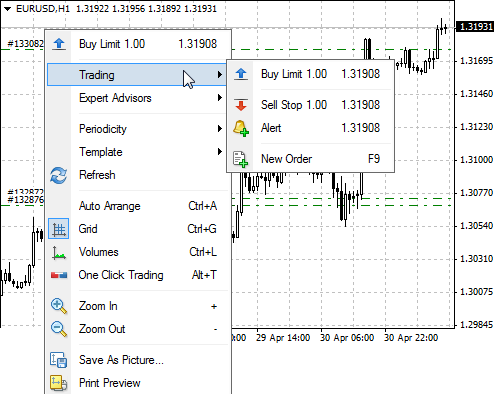
Alert can be quickly created right on a chart. To do it, execute the "![]() Alert" command in the chart context menu:
Alert" command in the chart context menu:

If the menu is opened above the current price the alert is created with condition "Bid > selected price", below the current price – "Bid < selected price". Alerts created from charts are automatically set to expire. The expiration time depends on the chart timeframe:
- For minute timeframes the expiration is set in hours. The number of hours corresponds to the number of minutes in the timeframe. For example, the expiration will be set to 1 hour on M1 timeframe, to 5 hours on M5 timeframe, to 30 hours on M30 timeframe, etc.
- For hourly timeframes the expiration is set in days. The number of days corresponds to the number of hours in the timeframe. For example, the expiration will be set to 1 day on H1 timeframe, to 2 days on H2 timeframe, to 6 days on H4 timeframe, etc.
- On a daily timeframe the expiration will be set to 24 days.
- On a weekly timeframe the expiration will be set to 2 weeks.
- On a monthly timeframe the expiration will be set to 2 months.
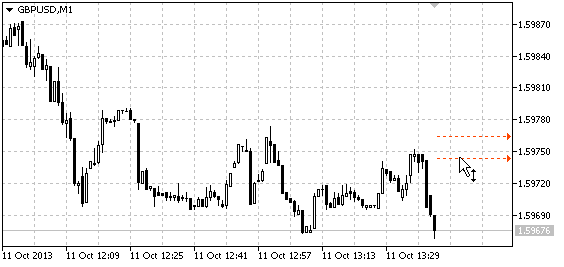
Alerts are displayed via red arrows on the right side of charts of the corresponding instruments:

The price level of an alert can be modified directly on the chart. Just drag the alert arrow using a mouse.
To display alerts on charts, enable "Show trade levels" option in the client terminal settings. |